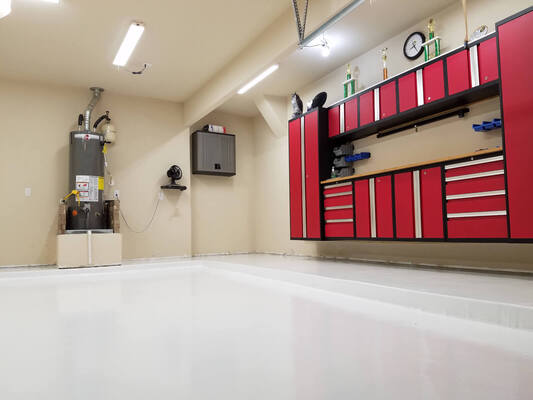
Introduction: Overview of Garage Floor Epoxy Installation
Transforming your garage floor with epoxy is a wise investment, offering a blend of durability, aesthetic enhancement, and easy maintenance. Epoxy flooring is renowned for its ability to withstand heavy traffic, resist stains, and provide a sleek, professional look. However, achieving these benefits requires meticulous preparation and application. This comprehensive guide will walk you through the process, ensuring your garage floor is both functional and visually appealing.
Materials Needed: Essential Tools and Products
To embark on your epoxy flooring journey, you’ll need a collection of essential tools and products. These include:
- Epoxy resin and hardener
- Concrete cleaner or degreaser
- Crack filler or concrete patch
- Grinding or etching tools
- Paint rollers and brushes
- Mixing buckets and stirring sticks
- Protective gear: gloves, goggles, and respirator
- Painter’s tape and plastic sheeting
- Decorative flakes (optional)
Gathering these materials beforehand will streamline the installation process and help you avoid unnecessary interruptions.
Preparation: Surface Cleaning and Repairs
The foundation of a successful epoxy floor lies in thorough preparation. Begin by clearing your garage of all items, sweeping away loose debris, and vacuuming the floor to remove fine dust particles. Next, use a concrete cleaner or degreaser to eradicate oil stains and contaminants. This step is crucial as any residual grease or dirt can impede epoxy adhesion.
Inspect the floor for cracks and damages. Small cracks can be filled with an epoxy crack filler, while larger imperfections might require a concrete patch. Ensure these repairs are smooth and level with the rest of the floor. For optimal adhesion, consider grinding the concrete surface or using an etching solution. This creates a textured surface that enhances the bonding strength of the epoxy.
Application: Step-by-Step Guide to Applying Epoxy
With the surface meticulously prepared, you’re ready to apply the epoxy. Here’s a step-by-step guide to ensure a flawless finish:
- Mixing the Epoxy: Follow the manufacturer’s instructions to mix the epoxy resin and hardener. Stir thoroughly to ensure a uniform consistency.
- Applying the Primer Coat: Begin with an epoxy primer to seal the concrete and create a solid base. Use a paint roller to apply the primer evenly across the floor. Allow it to dry according to the product specifications.
- Applying the Base Coat: Once the primer has dried, it’s time to apply the base coat. Pour the mixed epoxy onto the floor in sections and spread it using a paint roller. Work quickly, as epoxy can begin to set rapidly.
- Adding Decorative Flakes (Optional): If you desire a decorative finish, sprinkle color flakes onto the wet epoxy. Distribute them evenly to achieve the desired effect.
- Applying the Topcoat: After the base coat has cured, apply the topcoat. This layer provides additional durability and a glossy finish. Again, use a paint roller for an even application.
Curing: Importance of Proper Curing Time
Curing is a critical phase that should not be rushed. The curing process allows the epoxy to reach its full hardness and durability. Typically, epoxy flooring requires 24 to 48 hours to dry to the touch and up to 7 days to fully cure. During this period, avoid heavy traffic and placing objects on the floor to prevent any potential damage. Proper curing ensures your epoxy floor will withstand the test of time, maintaining its pristine appearance and functionality.
Encourage Readers to Follow the Guide for Success
In conclusion, installing epoxy flooring in your garage is a transformative project that enhances both the appearance and durability of the space. By following this detailed step-by-step guide, you can achieve professional results that will last for years. Remember, meticulous preparation and adherence to the curing times are key to success. Invest the effort, and you’ll enjoy a garage floor that is not only resilient but also visually stunning. Embrace this project with confidence, knowing that a well-executed epoxy installation can significantly upgrade your garage’s utility and aesthetic appeal.
Frequently Asked Questions
What are the benefits of using epoxy for garage floors?
Epoxy provides a durable, stain-resistant surface that enhances the appearance of the garage while protecting the concrete underneath. It’s easy to clean, withstands heavy traffic, and comes in a variety of colors and finishes.
What materials and tools are needed for epoxy floor installation?
Essential materials include epoxy resin, hardener, primer, topcoat, and possibly decorative flakes. Tools needed include paint rollers, brushes, mixing buckets, concrete cleaner, crack filler, and protective gear.
How do I properly clean and prepare my garage floor for epoxy?
Start by clearing the area and thoroughly cleaning the floor with a degreaser. Repair any cracks or damages, then grind or etch the surface to ensure proper adhesion.
How do I repair cracks and damages in the concrete before applying epoxy?
Small cracks can be filled with epoxy crack filler, while larger damages may require concrete patching. Ensure repairs are smooth and level before proceeding with epoxy application.
What are the steps involved in mixing and applying epoxy?
Begin by mixing the epoxy resin and hardener according to manufacturer instructions. Apply a primer coat, followed by the base coat, optional decorative flakes, and a topcoat. Allow each layer to cure as directed.
How long does it take for epoxy to cure, and what are the best practices?
Epoxy typically takes 24-48 hours to dry to the touch and up to 7 days to fully cure. During this time, avoid heavy traffic and keep the area well-ventilated to ensure proper curing.
Can I apply decorative flakes to my epoxy floor, and how is it done?
Yes, decorative flakes can be applied to epoxy floors for added texture and visual appeal. Simply sprinkle the flakes onto the wet epoxy base coat, ensuring even distribution.
What safety precautions should I take during epoxy floor installation?
Wear appropriate protective gear, including gloves, goggles, and a respirator, to avoid skin and respiratory irritation from epoxy fumes. Ensure proper ventilation in the workspace.
How do I ensure even application of epoxy on my garage floor?
Use a paint roller or brush to apply epoxy in even, overlapping strokes. Work in small sections to prevent the epoxy from drying before it can be spread evenly.
What are the common mistakes to avoid during epoxy floor installation?
Common mistakes include inadequate surface preparation, improper mixing of epoxy components, applying epoxy in extreme temperatures, and failing to allow sufficient curing time between coats.