Introduction: Importance of Proper Preparation
Embarking on the journey of installing epoxy flooring necessitates meticulous preparation. The allure of epoxy lies in its durability, seamless finish, and aesthetic appeal. However, these benefits are only attainable through rigorous groundwork. Proper preparation is not merely a preliminary step; it is the cornerstone of a successful installation. Neglecting this phase can lead to suboptimal results, marred by imperfections and reduced longevity. To ensure your epoxy floor stands the test of time, it is crucial to approach the preparation process with diligence and precision.
Cleaning: Steps to Ensure a Clean Surface
The foundation of a flawless epoxy floor is an impeccably clean surface. Begin by removing all debris, dust, and contaminants from the area. Sweep the floor thoroughly, followed by vacuuming to eradicate any residual particles. A comprehensive clean is essential to prevent any impurities from compromising the adhesion of the epoxy.
Next, employ a degreaser to eliminate any oil stains or grease spots. These substances can hinder the bonding process, leading to unsightly bubbles and peeling. Scrub the floor with a stiff-bristle brush to ensure the degreaser penetrates deeply. Once cleaned, rinse the surface with water and allow it to dry completely. This step is crucial, as moisture can interfere with the epoxy’s curing process.
To further enhance the cleanliness, consider using a concrete grinder or shot blaster. These tools will remove any existing coatings or sealants, providing a raw, porous surface for the epoxy to adhere to. The goal is to achieve a surface that is not only clean but also textured, allowing for optimal adhesion.
Repairs: Fixing Cracks and Damages Before Installation
Addressing any imperfections in the substrate is vital to the success of your epoxy floor. Begin by inspecting the surface for cracks, chips, or other damages. These blemishes can undermine the integrity of the epoxy, leading to premature failure.
For minor cracks, a high-quality epoxy crack filler or patching compound will suffice. Ensure that the filler is compatible with your epoxy system. Apply the filler with a putty knife, pressing it firmly into the crack. Allow it to cure as per the manufacturer’s instructions before proceeding.
In cases of more significant damage, such as large cracks or spalling, a more extensive repair may be necessary. Consider using a concrete resurfacer to restore the substrate’s integrity. This step is critical for ensuring a smooth, even surface, free from any weaknesses that could affect the epoxy’s performance.
Scheduling: Planning the Installation Process
Proper scheduling is essential to a seamless installation. Begin by selecting a time when the area will be free from foot traffic and other disturbances. Epoxy flooring requires several days to cure fully, so plan accordingly to avoid disruptions.
Consider the weather conditions as well. Extreme temperatures and high humidity can affect the epoxy’s curing process. Aim for a period with mild, stable weather to ensure optimal conditions for installation.
Coordinate with your epoxy supplier and contractor to ensure all materials and equipment are on hand before beginning the project. This foresight will prevent any delays and allow for a smooth, uninterrupted installation process.
Expectations: What to Expect During Installation
Understanding what to expect during the installation will help you prepare adequately. The process typically begins with surface preparation, followed by the application of the epoxy primer. The primer enhances adhesion and seals the substrate, creating a solid foundation for the subsequent layers.
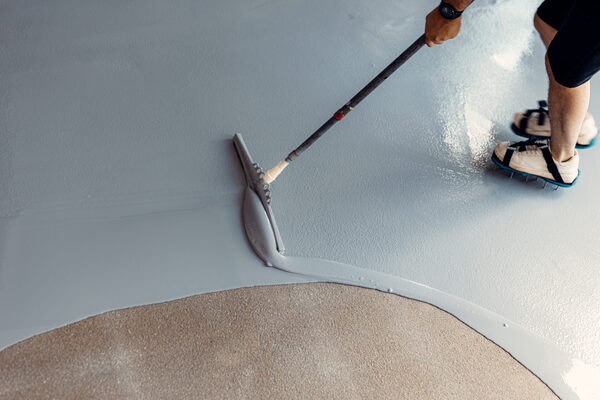
Next, the epoxy base coat is applied. This layer provides the floor’s primary color and base. Depending on your design preferences, decorative flakes or quartz can be broadcasted into the wet base coat to add texture and visual interest.
Once the base coat has cured, a topcoat is applied. This layer provides additional durability, UV resistance, and a glossy finish. The entire process can take several days, depending on the complexity of the design and the curing times between each layer.
Throughout the installation, expect some odor from the epoxy, though this typically dissipates quickly. Ensure the area is well-ventilated to facilitate the curing process and reduce any lingering fumes.
Emphasize the Importance of Preparation for Success
In conclusion, the key to a successful epoxy flooring installation lies in meticulous preparation. Each step, from cleaning and repairs to scheduling and understanding the installation process, plays a crucial role in achieving a flawless finish. By investing time and effort into proper preparation, you can ensure your epoxy floor will not only look stunning but also stand the test of time. Remember, a well-prepared surface is the foundation of an enduring, resilient, and beautiful epoxy floor.
Frequently Asked Questions
What are the initial steps to prepare for epoxy flooring installation?
The initial steps include clearing the area of all items, thoroughly cleaning the surface to remove dust, dirt, and grease, repairing any cracks or damages, and ensuring the floor is dry. Additionally, it is important to gather all necessary tools and materials and review the manufacturer’s instructions for the epoxy product you are using.
How important is cleaning the surface before applying epoxy flooring?
Cleaning the surface is crucial for a successful epoxy flooring installation. Any dirt, grease, or contaminants can prevent the epoxy from adhering properly, leading to bubbles, peeling, and reduced durability. A clean surface ensures a strong bond between the epoxy and the substrate.
What specific cleaning products are recommended for surface preparation?
A high-quality degreaser is recommended for removing oil and grease stains. For general cleaning, a mixture of water and a mild detergent works well. For more thorough cleaning, consider using a concrete cleaner or etcher to remove any stubborn contaminants and open up the pores of the concrete.
How do I repair cracks and damages in the concrete before installation?
Small cracks can be filled with an epoxy crack filler or patching compound. Apply the filler with a putty knife, pressing it into the crack, and smooth it out. For larger cracks or spalling, use a concrete resurfacer to restore the surface. Follow the manufacturer’s instructions for curing times before proceeding with the epoxy application.
What tools are necessary for surface preparation and epoxy application?
Essential tools include a broom, vacuum, stiff-bristle brush, degreaser, concrete grinder or shot blaster, putty knife, and safety gear such as gloves and goggles. For the epoxy application, you will need a paint roller, brushes, mixing bucket, and spiked shoes to walk on the wet epoxy.
How long should I wait for the surface to dry after cleaning it?
The drying time depends on the cleaning method used and the environmental conditions. Typically, you should wait at least 24 hours for the surface to dry completely. Ensure there is no residual moisture, as it can interfere with the epoxy’s curing process.
What weather conditions are ideal for installing epoxy flooring?
Ideal conditions include moderate temperatures, typically between 60-80°F (15-27°C), and low humidity. Extreme temperatures and high humidity can affect the curing process and the final finish of the epoxy. Check the weather forecast and plan the installation during stable weather conditions.
How do I schedule and plan the epoxy flooring installation process?
Schedule the installation during a period when the area will be free from foot traffic and other disturbances for several days. Coordinate with your epoxy supplier and contractor to ensure all materials and equipment are available. Allow ample time for each stage of the process, including surface preparation, application, and curing.
What can I expect during the epoxy flooring installation process?
The installation process typically involves surface preparation, applying an epoxy primer, followed by the base coat, and optionally broadcasting decorative flakes or quartz. After the base coat cures, a topcoat is applied for added durability and finish. The entire process can take several days, depending on the design complexity and curing times.
How long does it take for epoxy flooring to cure completely?
Epoxy flooring generally takes 24-48 hours to dry to the touch and up to 7 days to cure completely. During this period, avoid any heavy traffic or placing objects on the floor to ensure a flawless finish. Follow the manufacturer’s recommendations for specific curing times.